Showing posts with label Tony Kuyper. Show all posts

Friday, January 1, 1982

Luminosity Masks Part I

...
I n t r o d u c t i o n
by © Tony Kuyper
..
The first I heard of luminosity masks was in a spam email I received several years ago inviting me to sign up for a Photoshop seminar. Since I had little inclination to attend the pricey seminar, Google provided me with a general idea of what a luminosity mask was and how to create it. In the months and years that followed, I created several different versions of these masks that made them more useful. I'm now at the point that I use luminosity masks in every image I work on in Photoshop. (Note: Information on other Photoshop techniques I frequently use have also been added to this website: Saturation Masks, Digital Scheimpflug, and Cloning Color, Retaining Texture.)
...
Luminosity masks are an excellent way to help define a personal vision of a scene. They have the ability to overcome shortcomings in the tonal values that were captured by the camera or film and to correct tones that shifted during image manipulation. While luminosity masks are created in Photoshop, they aren't available from the drop-down menus and can't be created with tools in Photoshop's Tools palette. The two primary masks, "Lights" and "Darks", are very easy to create. From there, however, it becomes more complex as the various selections are intersected and subtracted. But don't worry. This tutorial will tell you how to do all the necessary steps to create a wide array of very useful masks. In addition, the last page of this tutorial will tell you how to get the set of Photoshop actions I use to create the masks. The actions greatly simplify the process of generating the masks; a couple of clicks and you're done. Once you know the necessary steps, you can create your own actions or use mine There are also plug-ins and actions that you can find and download from the Internet if you're so inclined.
....
Before going too far, I should mention that I work on a Windows-based computer using Photoshop CS. The instructions in this tutorial will be given with those parameters in mind. Some facility with Photoshop will be assumed. While the details of the processes will be explained, I won't attempt to provide definitions of every Photoshop term or how to perform common steps. There are many reference guides to Photoshop that can help you, including the User Guide and the embedded "Help" menu in Photoshop, but if you've worked (or played) with Photoshop, you're probably familiar enough with the program to do the necessary steps. Additionally, I prefer to use Photoshop shortcut keys whenever possible. These are a combination of the Shift, Ctrl, and/or Alt keys being held down at the same time and, while continuing to hold them down, hitting a letter, number, or symbol on the key board. The ones I list will be the defaults that come programmed into Photoshop. If you've altered your shortcut keys to change the defaults, it's assumed you're smart enough to know what your corresponding shortcut is or can at least restore the defaults. Mac users will hopefully know or can look up the corresponding key combinations for their computers. There are usually drop-down menu commands that correspond to the shortcut keys, but these often become more complex than the shortcut keys, so I generally don't use them. I also like the classic Windows look to my programs with neutral gray colors, so the screen captures might look a little old-fashioned.

...

YOU ARE HERE — Introduction!!!
NEXT—The Basic Mask—"Lights"
Understanding Masks
Using the "Lights" Mask
Different Masks for Different Tones
Experimentation is the Key
Getting the Actions
..
Link: by © Tony Kuyper
- For More Info on retouching go to »
RETOUCH Pro 001
- For More Info on retouching go to » RETOUCH Pro 002

Luminosity Masks Part II

....
The Basic Mask—"L i g h t s"
by © Tony Kuyper
..
Luminosity masks are nothing more than selections based on the brightness values of the image. The basic luminosity mask, called "Lights", selects pixels in proportion to their brightness in the image. There are three different ways to create this basic luminosity mask (Figure 1). I'll list all three alternatives, but you only need to do one of them to create the selection.

1. Type Alt-Ctrl+~. Hold down the Ctrl and Alt keys and hit the "tilde" which is just to the left of the number "1" key on the keyboard.

2. Ctrl+click the RGB channel. Hold down the Ctrl key and click thumbnail image of the RGB channel.

3. Drag the RGB channel to the Load Selection button at the bottom of the Channels palette.

Figure 1
....
...

The marching ants appear on the image to define the selection (Figure 2). Since Photoshop only puts marching ants around pixels that are at least 50% selected, and since this selection is based on the brightness of the image, the marching ants only appear around pixels that are equivalent to 50% gray or brighter. I'll discuss this in more detail later. For now it should be obvious that the marching ants are enclosing the lighter areas of the image.
..
Figure 2
..
Once you've created the selection of the light areas of the image, it's a good idea to save it.

To do this:

1. Click the Save Selection button at the bottom of the Channels palette. A channel called "Alpha 1" will appear in the Channels palette (Figure 3).
2. Double click on the name "Alpha 1" and type "Lights" and then hit the ENTER key to rename this channel (Figure 4).
3. Click the RGB Channel to make it active and to restore the color view of the image (Figure 4).
4. Type Ctrl+D to turn off the marching ants.
..
Figure 3
..
Figure 4
...
That's it! This is all that's needed to create the luminosity mask for the light areas of the image. It took a bit of writing to explain, but once you try it you'll see how easy it really is.

Technically, what was actually created in the above steps was an alpha channel of the selection. It won't actually be a mask until it's applied to a layer in the Layers palette. However, masks and alpha channels look entirely the same, they just reside on different palettesaa, so I'll be using the term "mask" to describe both from here on.
..
Introduction!!!
YOU ARE HERE — The Basic Mask—"Lights"
NEXT—Understanding Masks
Using the "Lights" Mask
Different Masks for Different Tones
Experimentation is the Key
Getting the Actions
..
Link: by © Tony Kuyper
- For More Info on retouching go to » RETOUCH Pro 001
- For More Info on retouching go to » RETOUCH Pro 002

Luminosity Masks Part III

...
Understanding Masks
2006 by © Tony Kuyper
...
To appreciate the usefulness of this mask and other luminosity masks, it's important to understand exactly what masks are and how they work. Selections are normally created in Photoshop using the Marquee, Magic Wand, and Lasso tools. Typically these selection tools create pure black and white masks. That is, if you were to hit the "Save selection" button on the Channels palette after using one of these selection tools, the mask would be filled with only pure black and pure white with sharply defined edges. Blurring, feathering, and anti-aliasing can introduce some gray tones for a less abrupt transition, but for the most part, the mask remains mostly all black and white (Figure 5).
...
Figure 5
...

Masks are routinely used in combination with layers in Photoshop, and the rule for masks is that "white reveals and black conceals." Pure white in the mask allows the corresponding pixels on the layer to be completely visible in the image. Pure black on the mask blocks the corresponding pixels on the layer from appearing in the image. It's important to understand that the blocking effect of black in the mask only occurs on the layer to which the mask is applied. If pixels are blocked from appearing on one layer, Photoshop sequentially looks down to the layers below to find unblocked pixels it can display. Black areas of the mask essentially tell Photoshop to look lower in the layer stack for what the pixel should look like. Shades of gray in a mask allow pixels to appear in the image in proportion to how light or how dark the gray value is. A mask that is 50% gray, for example, allows pixels on that layer to be visible in the image at half their normal opacity. Photoshop will have to find the other half from unblocked pixels deeper in the layer stack. Darker gray values in the mask allow proportionally less of the layer to show and lighter gray values proportionally more.

So now let's take a closer look at the "Lights" luminosity mask that was created. By clicking on the thumbnail image of the "Lights" channel or on the word "Lights" to the right of the thumbnail, the mask itself is now visible on the main image area in Photoshop (Figure 6). You can see that it is a perfect grayscale positive of the image and contains very little pure white and pure black. It is composed of shades of gray that perfectly mirror the brightness values in the image. As such, when this mask is applied to an adjustment layer, it will reveal the effect of the adjustment most on the brightest pixels in the image (white reveals) and proportionally less as the pixels get darker (black conceals). This leads to one of the most important properties of luminosity masks: they are completely self-feathering. The effect on the image will be obvious, but there will be no way to tell where the effect begins and where it ends. There are no hard edges like with Photoshop's selection tools and no need to try and make a perfect selection. Because the luminosity mask was created from the image itself, it has the perfect gradation of shades to insure that each and every pixel will be affected in exact proportion to its brightness.

...

Figure 6


Introduction!!!
The Basic Mask—"Lights"

YOU ARE HERE — Understanding Masks
NEXT—Using the "Lights" Mask
Different Masks for Different Tones
Experimentation is the Key
Getting the Actions
..
Link: by © Tony Kuyper
- For More Info on retouching go to » RETOUCH Pro 001
- For More Info on retouching go to » RETOUCH Pro 002

Luminosity Masks Part IV

...
Using the "Lights" Mask
by © Tony Kuyper

A good way to see how the "Lights" luminosity mask works is with an image called "Zion Narrows" that I posted in an online discussion/critique forum. There were several comments that it looked a little overexposed. This suggested that the light areas of the image might be a little too bright, so using the "Lights" mask was one possible solution. An adjustment through the mask would allow me to correct this perceived brightness by darkening the image's light areas since the mask would be correspondingly light and revealing of the adjustment. It would at the same time protect the shadows from getting too dark since the mask would also be darker and therefore concealing of the adjustment in these areas. In other words, the mask allows the adjustment to affect predominantly the light areas of the image while at the same time sparing the dark areas. The process for using the "Lights" mask is relatively straightforward and goes like this:

First create the "Lights" mask as previously described in the The Basic Mask—"Lights" section.

Then, and this is very important, make sure the mask is loaded as a selection. If you're using my actions (available at the end of this tutorial) to create a luminosity mask, the mask is created, placed on the Channels palette, and given the proper name. However, it is not an active selection; there are no marching ants. In order to actually use the luminosity mask with an adjustment layer, it is necessary to properly load it to make the mask an active selection. This is done using any one of the following methods (Figure 7):

  • Type Alt-Ctrl+number. Hold down the Alt and Ctrl keys and type the number of the mask's corresponding channel in the Channels palette (Alt-Ctrl+4 in this case).
  • Drag the channel to the Load Selection button at the bottom of the Channels palette.
  • Ctrl+click the thumbnail image or the channel name. (NOTE: Do not Ctrl+click on the eyeball square to the left of the thumbnail image as this does not load the channel as a selection.)
..
Figure 7


..
Once the ants of the selection are marching again, move to the Layers palette. At the bottom of the layers palette is a half white/half black circle which is the "Create new adjustment layer" button. Click it and choose "Curves . . ." from the pop-up menu that appears (Figure 8).
..
Figure 8

A new layer immediately appears on the Layers palette with a mask in place that matches the "Lights" mask, which was the active selection. Simultaneously a Curves dialog box appears (Figure 9).

Figure 9
Make the adjustment in the Curves dialog box to darken the highlights and click "OK". Figure 10 shows the curve I chose and the results with the mask in place. The "white reveals" rule for masks insures that the adjustment occurs mainly in the light areas of the image. For comparison, I've also shown the results with the mask disabled. Although it might be difficult to see on a monitor, if you look closely you should be able to make out that without the "black conceals" moderating effect of the mask, the dark areas in the image get significantly darker as a result of the adjustment.
..
Figure 10
Introduction!!!
The Basic Mask—"Lights"

Understanding Masks
YOU ARE HERE — Using the "Lights" Mask
NEXT—Different Masks for Different Tones
Experimentation is the Key
Getting the Actions
..
Link: by © Tony Kuyper
- For More Info on retouching go to » RETOUCH Pro 001
- For More Info on retouching go to » RETOUCH Pro 002

Luminosity Masks Part V

...
Different Masks for Different Tones
by © Tony Kuyper

The self-feathering feature of the luminosity masks makes them incredibly useful. It's like making the perfect selection each and every time with no effort at all. No zooming-in to make sure all the necessary pixels are included in the selection and no need to go back and touch up the edges of selections after the adjustment is made. The luminosity mask takes care of all that. In addition, the "Lights" mask is only the starting point for the different types of luminosity masks that can be created. The "Lights" mask is useful if you want to adjust the light areas of the image, but the shadows and mid-tones frequently need adjustment too. From the basic "Lights" luminosity mask, a large number of additional masks can be generated that target these other brightness levels in the image. I'll list them below and describe how they are made. Using this information you should be able to make a series of Photoshop actions to create the various masks. Information on how to obtain a set of actions for all the luminosity masks is available on the last page of the tutorial. With an action set, you simply need to run the action for a particular mask and it's ready to use.

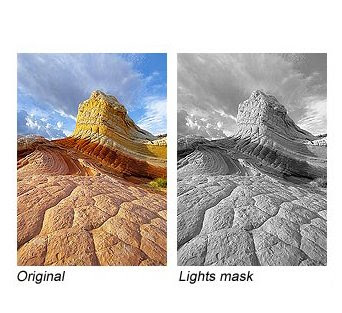
I've chosen a different image to illustrate the various luminosity masks, one that is less abstract and therefore easier to see the features in the masks. As you look at the various masks, you will always see a grayscale outline of the original image. Selections from these masks, as a result, will have the perfect tonal gradation so that adjustments made using the masks will blend in seamlessly.

Figure 11 shows the four masks that target the bright areas of the image:

  • "Lights"
  • "Light Lights"
  • "Bright Lights"
  • "Super Lights"

They are created by progressively intersecting selections of the same mask. Intersection is when Photoshop creates a new selection by finding the pixels that two selections have in common. To use it, load a mask as a selection as described in Figure 7 in the Using the "Lights" Mask section. Once the ants are marching, Shift-Alt-Ctrl+click on the same mask to do the intersection operation. In this way, the "Light Lights" mask comes from intersecting the "Lights" mask with itself. The "Bright Lights" mask comes from intersecting the "Light Lights" mask with itself, and so on. Each gradually narrows the pixels selected to brighter and brighter areas of the image. Check the "Super Lights" mask in Figure 11. Dark values in the mask are essentially black. Details can only be seen in the lightest values of the image, so only the very lightest areas will be affected on an adjustment layer with this mask in place. Still, the light areas of the image can be seen as a grayscale positive in the mask which tells you that the selection generated from this mask will be perfectly feathered for whatever adjustments are made using it.

Figure 11
The "Light" Luminosity Masks. From Left to Right, masks when loaded as selection will restrict adjustments to lighter and lighter areas of the image.
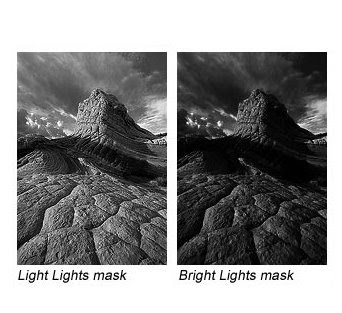
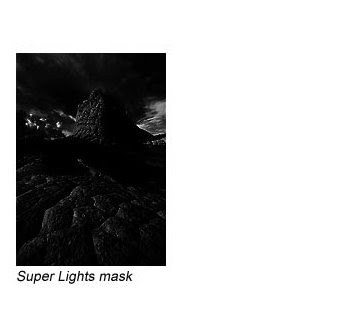
While the "Lights" mask would seem like a good one to use in adjusting the light areas of the image, "Light Lights" and "Bright Lights" often work better. There is a lot of gray in the dark values of the "Lights" mask, so adjustments through this mask significantly bleed into the image's dark values. The "Light Lights" and "Bright Lights" frequently do a better job of isolating the adjustment to just the light values since the dark values of the image are darker gray or even black in these masks.

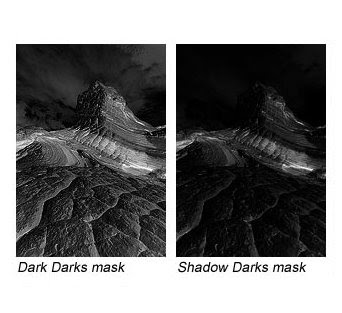
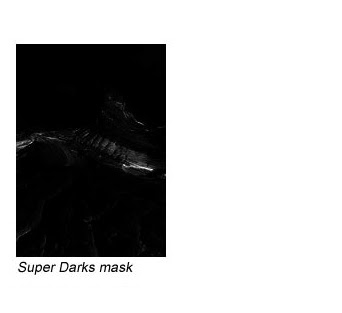
Now for the darks. The primary "Darks" mask is simply the inverse of the "Lights" mask (Shift-Ctrl+I after loading the "Lights" mask as a selection). Then once again progressively intersect the masks with themselves to create narrower and narrower selections of the dark areas of the image. The resulting masks are called:

  • "Darks"
  • "Dark Darks"
  • "Shadow Darks"
  • "Super Darks"

Since the "Darks" luminosity mask is the inverse of the "Lights" mask, these are all negatives of the image. Each progressively restricts the selection to darker and darker image pixels (Figure 12). In the mask for the "Super Darks", bright areas in the image are essentially black meaning they'll remain unaffected by any adjustment applied using the mask. In a manner similar to the masks for the light areas, "Dark Darks" and "Shadow Darks" often work best for isolating adjustments to the dark values in the image.

Figure 12
The Mid-Tones" Luminosity Masks. From Left to Right, masks when loaded as selection will restrict adjustments to wider and wider areas of Mid-Tones in the image.
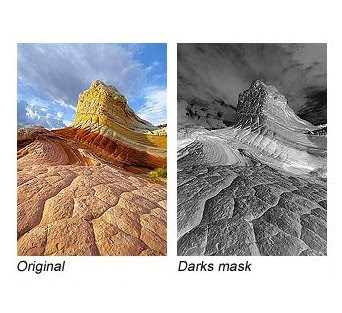
The mid-tones are a little trickier to get at, but lead to some very useful masks. You have to first select the entire image (Ctrl+A) and then subtract off one light and one dark mask. Subtraction is accomplished by an Alt-Ctrl+click on whatever mask you want to subtract. When you remove the light and dark tones of an image, you're left with mid-tones. For the masks included in the downloadable actions, I've chosen to progressively subtract the masks in the order they're listed above. Here are the mid-tone masks:
  • "Basic Mid-Tones" = "Lights" and "Darks" subtracted from the entire image
  • "Expanded Mid-tones" = "Light Lights" and "Dark Darks" subtracted from the entire image
  • "Wide Mid-tones" = "Bright Lights" and "Shadow Darks" subtracted from the entire image
  • "Super Mid-tones" = "Super Lights" and "Super Darks" subtracted from the entire image

Figure 13 shows that the masks for the mid-tones get progressively lighter as more and more pixels are included in what the selection defines as a mid-tone. You could obviously choose a variety of ways to make a mid-tones mask since there are four each of the dark and light masks to choose for subtraction. The ones listed here are a good starting point. To target different tones, you can always subtract or add (Shift-Ctrl+click) additional dark and light masks to the initial mid-tones selection. My experience is that the "Basic Mid-tones" and "Expanded Mid-tones" masks work well for most mid-tones adjustments. The "Wide" and "Super Mid-tones" can be useful when creatively combining masks.

Figure 13